|
Size: 759
Comment: initial contents
|
← Revision 26 as of 2014-03-31 01:54:16 ⇥
Size: 3837
Comment: Formatting
|
| Deletions are marked like this. | Additions are marked like this. |
| Line 1: | Line 1: |
| ## page was renamed from MemberManual/TransferringFiles/OpenAFS/WindowsClient | |
| Line 5: | Line 6: |
| [[TableOfContents]] | <<TableOfContents>> Please note that OpenAFS runs a '''service''' so you must have a user account on Windows that allows management of services. For example, the '''powerusers''' group on Windows XP has such privileges but the default limited users account does not. |
| Line 9: | Line 12: |
| 1. Kerberos - [http://web.mit.edu/Kerberos/dist/index.html download page] 1. OpenAFS Client - [http://www.openafs.org/pages/windows.html download page]. We recommend downloading the "''32-bit EXE installer for individual installations''". |
1. Heimdal Kerberos 1.6.x.x - [[https://www.secure-endpoints.com/heimdal/#download]]. - According to the OpenAFS guide, MIT Kerberos has stability issues on Windows 7/8. 1. Network Identity Manager 2.0 - [[https://www.secure-endpoints.com/netidmgr/v2/index.html]] 1. OpenAFS Client 1.7.x - [[http://www.openafs.org/pages/windows.html|download page]]. |
| Line 14: | Line 18: |
| First, install Kerberos. Here's some details to input when the appropriate dialog prompts: | 1. First, install Kerberos. All defaults are appropriate. <<BR>> {{attachment:heimdal-1.png}} 1. Then, modify your krb5.conf (in `%SystemDrive%\ProgramData\Kerberos`) and add `allow_weak_crypto = true` under `[libdefaults]`. <<BR>>{{attachment:heimdal-2-new.png}} |
| Line 16: | Line 21: |
| == Network Identity Manager == A Typical installation is appropriate. OpenAFS will install a plugin to this that will assist you in managing your AFS tokens. |
|
| Line 18: | Line 27: |
| 1. '''Choose Setup Type''' -- select ''IFS Based Client''. <<BR>> {{attachment:openafs-1.png}} 1. '''Configure AFS Client''' -- For "Default Cell" use `hcoop.net`. The rest of the defaults are sound. <<BR>> {{attachment:openafs-2.png}} 1. Proceed with the installation and reboot. |
|
| Line 19: | Line 31: |
| = Post-Install Configuration = | = Hints and Tips = If you are using Explorer to view your AFS share, your right-click on file or folder context menu will have a new entry called ''AFS''. Within this sub-menu, you will find tools that allow changing of Access Control Lists (permissions), creating new mount points, and more. With this context menu, it is possible that you won't have to ever use the command-line to manage your share! = Troubleshooting = == AFS Worked, But Now it Doesn't == Sometimes when a computer goes to sleep and then resumes, the AFS service will not work. This may also be the case in other situations. That said, the first step to solving AFS problems is to stop and start the AFS service using the AFS Client. 1. Click on the lock icon in the system-tray. 1. Click on the AFS Client ''Advanced Tab''. 1. Click on ''Stop Service'' and wait a few moments. 1. Click ''Start Service''. 1. If necessary, re-log in using AFS Client. You should now be ready to use your AFS shares. Again, please note that you must have appropriate privileges to stop and start services. == AFS Never Worked! == Please check your software and hardware firewall configurations. To be sure that your software firewall is not blocking the client, stop and restart the service. Your software firewall may then catch it and prompt. Although the service may start at boot, when you log-in, the software firewall may block it by default. Finally, ensure the following UDP ports are open: 7000-7007. You may want to uninstall and reinstall OpenAFS and retry these installation directions. Check the Network Identity Manager to be sure the realm is HCOOP.NET (yes, it must be ALL CAPS). In general, HCoop support cannot troubleshoot your system troubles, so please do not submit a Bugzilla ticket unless you're sure our servers are misbehaving. However, members in our IrcChannel will likely be happy to assist, though you may need to be patient while waiting for someone to respond. ---- CategoryMemberManual CategoryNeedsWork |
This is the chapter of the MemberManual that describes how to install the OpenAFS client on Windows.
Contents
Please note that OpenAFS runs a service so you must have a user account on Windows that allows management of services. For example, the powerusers group on Windows XP has such privileges but the default limited users account does not.
Software to Download
You will need to download the latest versions of the following software:
Heimdal Kerberos 1.6.x.x - https://www.secure-endpoints.com/heimdal/#download. - According to the OpenAFS guide, MIT Kerberos has stability issues on Windows 7/8.
Network Identity Manager 2.0 - https://www.secure-endpoints.com/netidmgr/v2/index.html
OpenAFS Client 1.7.x - download page.
Installation
Kerberos
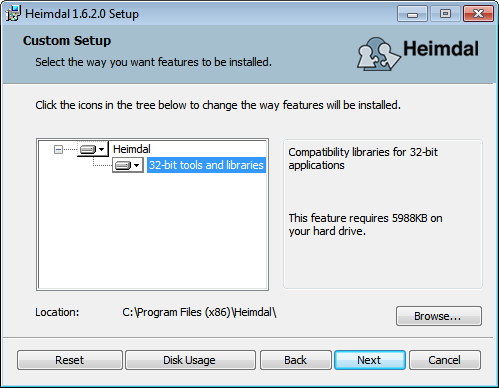
First, install Kerberos. All defaults are appropriate.

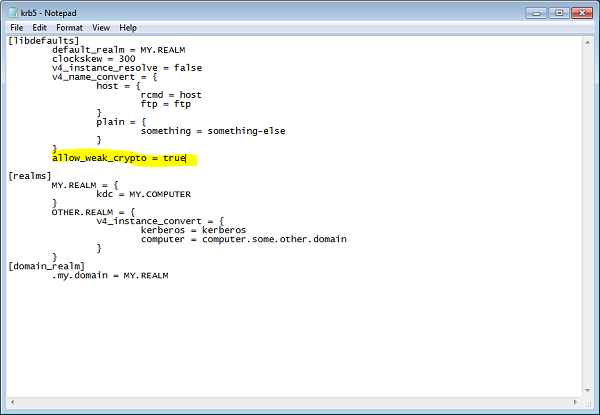
Then, modify your krb5.conf (in %SystemDrive%\ProgramData\Kerberos) and add allow_weak_crypto = true under [libdefaults].

Network Identity Manager
A Typical installation is appropriate. OpenAFS will install a plugin to this that will assist you in managing your AFS tokens.
OpenAFS
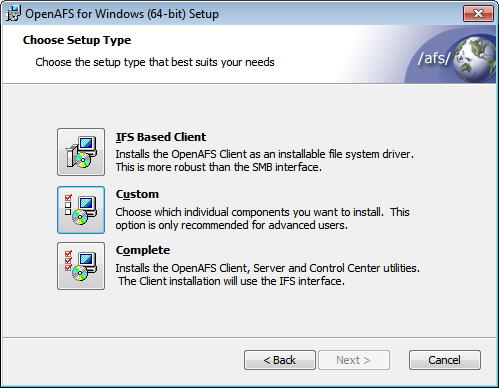
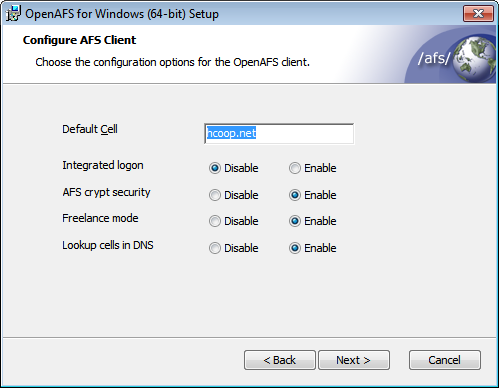
Install OpenAFS and input the following when the appropriate dialog prompts:
Choose Setup Type -- select IFS Based Client.

Configure AFS Client -- For "Default Cell" use hcoop.net. The rest of the defaults are sound.

- Proceed with the installation and reboot.
Hints and Tips
If you are using Explorer to view your AFS share, your right-click on file or folder context menu will have a new entry called AFS. Within this sub-menu, you will find tools that allow changing of Access Control Lists (permissions), creating new mount points, and more. With this context menu, it is possible that you won't have to ever use the command-line to manage your share!
Troubleshooting
AFS Worked, But Now it Doesn't
Sometimes when a computer goes to sleep and then resumes, the AFS service will not work. This may also be the case in other situations.
That said, the first step to solving AFS problems is to stop and start the AFS service using the AFS Client.
- Click on the lock icon in the system-tray.
Click on the AFS Client Advanced Tab.
Click on Stop Service and wait a few moments.
Click Start Service.
- If necessary, re-log in using AFS Client.
You should now be ready to use your AFS shares. Again, please note that you must have appropriate privileges to stop and start services.
AFS Never Worked!
Please check your software and hardware firewall configurations. To be sure that your software firewall is not blocking the client, stop and restart the service. Your software firewall may then catch it and prompt. Although the service may start at boot, when you log-in, the software firewall may block it by default. Finally, ensure the following UDP ports are open: 7000-7007.
You may want to uninstall and reinstall OpenAFS and retry these installation directions. Check the Network Identity Manager to be sure the realm is HCOOP.NET (yes, it must be ALL CAPS). In general, HCoop support cannot troubleshoot your system troubles, so please do not submit a Bugzilla ticket unless you're sure our servers are misbehaving. However, members in our IrcChannel will likely be happy to assist, though you may need to be patient while waiting for someone to respond.
